SHA1:
- aef75ada634aa2b2447a3a6502645b74b1e9e018
- 06362b7e8a9cf9bee2da7350b5770a5fa4bb4048
- 5072a9b3667b14860cccb2212ba7f0570b75bea2
- 8284b2a55d615981d8019bc83c1aab59fe7d2fd6
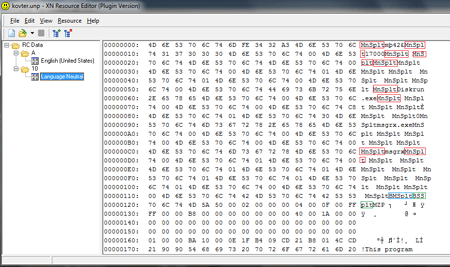
A dropper Trojan for Windows designed to install malware. Its code contains a lot of random lines and function calls, which makes it harder to analyze the Trojan, and its library is hidden among resources of Trojan.MulDrop6.42771 in the form of an image (bitmap). The main library is packed with MPRESS and contains the configuration file with a payload and a script. The configuration file has several line separators such as "MnSplt", "BMSplt", "DMSplt", "BSSplt”, and "DSSplt”, which determine whether some options are available or not.
The Trojan can show random text messages on the screen using MessageBox and identify the presence of the following debugging tools:
- The SbieDll.dll module—in the memory
- VMWare
- VirtualBox—by availability of the HKLM\HARDWARE\ACPI\DSDT\VBOX__ key
- Debugging tool by the PEB.NtGlobalFlag flag
- Process Monitor—using the FindWindow("PROCMON_WINDOW_CLASS”) function
- Process Explorer—using the FindWindow("PROCEXPL”) function
If it detects any of them, the Trojan terminates its operation.
It also uses the CMD command to disable the Windows user accounts control (UAC):
cmd.exe /k %windir%\System32\reg.exe ADD HKLM\SOFTWARE\Microsoft\Windows\CurrentVersion\Policies\System /v EnableLUA /t REG_DWORD /d 0 /fThe configuration file stores the information about the installation path and the name of the Trojan. The installation path can be selected using the folowing environmental variables: Temp, process_folder, SystemDrive, windir, windir_system32, programfiles, appdata, and userprofile. The Trojan uses seven different ways to enable its autorun in the system—how the Trojan will be launched is stipulated in its configuration file.
- The C:\Users\<username>\AppData\Local\Temp\<file name>.txt file with the Trojan’s body and the C:\Users\<username>\AppData\Local\Temp\<file name>.vbs script, which decrypts and runs the first file, are created in a temporary folder. Names of these files are retrieved from the configuration file. The dropper’s library resources store the script template containing the file’s location path that is changed before saving. The <file name>.vbs script is saved to the autorun folder. In the temporary folder, the cpy.vbs script is created. It looks as follows:
where <filename> is the name of the file specified in the configuration file.Dim FSO Set FSO = CreateObject("Scripting.FileSystemObject") FSO.CopyFile "C:\Users\<username>\AppData\Local\Temp\<filename>.vbs", "C:\Users\<username>\AppData\Roaming\Microsoft\Windows\Start Menu\Programs\Startup\<filename>.vbs" , 1 strUs = Wscript.ScriptFullName FSO.DeleteFile("C:\Users\<username>\AppData\Local\Temp\<filename>.vbs") FSO.DeleteFile(strUs)
Once the script is created, it is executed. VBS files in the autorun folder and TXT files in the temporary folder are appended with the “Read Only”, “Hidden”, and “System” attributes. - The branch of the system registry is modified:
where <path> is a location path of the Trojan.HKEY_LOCAL_MACHINE\Software\Microsoft\Windows NT\CurrentVersion\Winlogon "Shell"="explorer.exe, <path>" - The branch of the system registry is modified:
where <path> is a location path of the Trojan.HKEY_LOCAL_MACHINE\Software\Microsoft\Windows NT\CurrentVersion\Winlogon "Userinit"="C:\\WINDOWS\\system32\\userinit.exe, <path>" - The branch of the system registry is modified:
HKEY_LOCAL_MACHINE\Software\Microsoft\Windows\CurrentVersion\Policies\Explorer\Run - The branch of the system registry is modified:
HKEY_LOCAL_MACHINE\Software\Microsoft\Windows\CurrentVersion\Run - The branch of the system registry is modified:
HKEY_CURRENT_USER\Software\Microsoft\Windows\CurrentVersion\Run - The Trojan copies itself to root folders of all connected drives and creates the autorun.inf file:
where <path> is a location path of the Trojan.[autorun] shellexecute=<path>
To place the Trojan to a target folder and to execute autorun using the registry, the following script is applied:
Dim FSO
Set FSO = CreateObject("Scripting.FileSystemObject")
FSO.CopyFile "<path 1>", ""<path 2><filename>.exe" , 1
strScript = Wscript.ScriptFullName
FSO.DeleteFile(strScript)The Trojan can be optionally run with BATCH file:
PING 127.0.0.1 -n 2
start "" "<path 2><filename>.exe"
del %0
exitThe payload can be launched using six different methods:
- To get access to the default browser, the Trojan reads the value of the HKEY_CLASSES_ROOT\http\shell\open\command key. Then it creates a new suspended process and incorporate itself in its image. If the WOW64 subsystem is used, the Trojan modifies the path to the browser replacing “Program Files\” with “Program Files (x86)\”. Then the Trojan allocates some memory for the downloader’s image, places the payload there and runs the process.
- Allocates the memory for the downloader’s image, places the payload there and configures imports. Then it calls the DllEntry function to load the library to the memory. After that, the Trojan checks this library for the LoadDotNetPE export, reads the data array from the configuration file, copies it to a separate memory, and transfers it to LoadDotNetPE.
- Loads the payload to the memory in the form of a dynamic library by calling the DllEntry function.
- Saves the payload to the disk and at the path specified in the Trojan’s configuration and executes it.
- Downloads the payload from the network, saves it to the disk and at the path specified in the Trojan’s configuration and executes it.
- Executes the payloads in its process. If it fails to free some disk space, the process is terminated. It checks for the presence of the TLS application in the image. If successful, a memory page is allocated, and its address is placed to TEB.ThreadLocalStorage (fs:[0x2C]). Then the Trojan scans the image from its end to the beginning for the following instruction:
The content of the instruction is changed to mov edx,<previously allocated memory page>, adding two nop commands. Then it passes control to the input point.648B152C000000 mov edx,fs:[00000002C]

